Monday, October 10, 2016

Procedural Plate Tectonics

Last time we covered noisy layering in order to make biomes. This was done relatively arbitrarily though and we saw weird biomes like tundras being in the middle of deserts. This is obviously something we don't want to happen so we need to make a better procedural algorithm to make biomes.

I've decided to take this whole thing a step further. Instead of using simplex noise to determine heights like we did last time, we're going to procedurally make plate tectonics. To those of you who don't remember 9th grad science, the Earths out shell is made of a serious of plates that move very very slowly. However, over millions of years this movement causes many landforms that we know today, like mountains! In theory, procedurally generating some plates and then simulating their movement could generate very interesting and realistic landmasses. 

So how do we go about generating plates? Well I thought of two different methods that could work. The first one is slightly more complicated. For this, we choose an arbitrary number of plates and a starting point. From there a neighboring block is chosen and added to the plate. This is then looped through all the plates until there are no more empty spaces. Let's take a look at the code quickly.

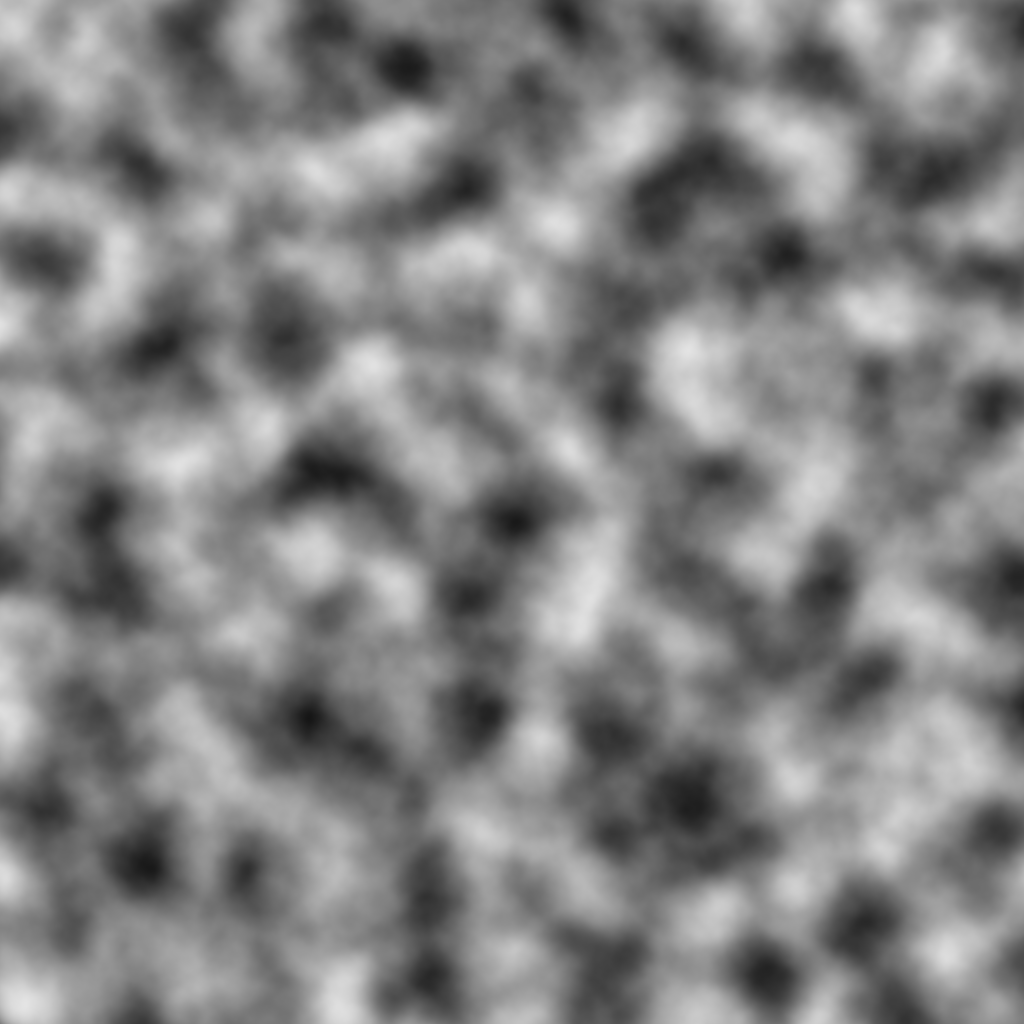
We can see from the code that we first keep track of all the empty spaces, then choose random distinct starting points for reach plate. Then we loop through each plate, get a random neighbor and try to add it to the plate list. This process is pretty slow and these take a while to generate. However, once it finishes and we colorize each plate, we get an image like the one below.
I had really high expectations for this algorithm to work and I was less than pleased with the results. We can see we get very long plates like the light-blue in the middle. I was hoping for a more "blobby" plate like actual Earth plates. While I'm sure this method could be modified to give more desirable results, it's still pretty slow so I decided a new approach.

Attempt two took a slightly different but similar approach. First I choose an arbitrary number of points to be the plate "centers." From there, I checked every point on the graph and colorized it based on the closest "tectonic center." The code for this is drastically easier to understand.

As you can see it's actually quite simple to do this. Just some simple loops and checking. ( It should be noted that this is NOT the best way to do this by any means. This is a brute force method. There are much better algorithms like Fortune's Algorithm that do this much faster than me. ) What this generates is called a Voronoi diagram where each point is colored based on its closest reference point.

When we run this we get a picture like below.
While this looks interesting, I'm still not 100% happy with how it will work for plates. For one, looking at a real map of plates, they do not have such straight lines. These are "blobbier" though which I am happy about.

Turns out making procedural plates is harder than I thought it would be. I may re-visit this or go with the Voronoi diagram, I've not decided yet. Either way, we will be combining this with many other procedural algorithms so this is just a starting place. We still have a long way to go!

As usual the code can be found here. Thanks for reading.

Thursday, October 6, 2016

Noise Layering

Now that we've covered a variety of different noise algorithms, we can start to actually put them to use. Noise algorithms can be used for a large variety of things and many noise algorithms with different seed can be used with one another to give interesting designs.

This is what we will be doing today. We are going to use 3 simplex noise algorithms, all with different seeds, to create a "world" with different biomes. These 3 noise algorithms will be a heightmap, a heatmap, and a rainfall map. The heightmap will determine 1 of 5 possible options. Lake, beach, biome, mountain, or snow-topped mountain. 

If the heightmap makes it a biome, we need to determine the different biomes based on the heat and rainfall at a select point. This is where the image below comes into play.
We can see on this image that the amount of rain and the temperature determine what the biome is. It gives us 10 possible biomes to choose from and each biome corresponds to a specific color in our final image.

Let's take a look at how this is actually done.

We can see that this part is quite simple. We supply a width and a height and every point on there we get the simplex noise 3 times. One for height, one for wetness, and the last for temperature. We then call the method GeneratePoint with the 3 values returned and this is what makes the biome colors. Let's take a look at that method.
GeneratePoint is quite a simple method as you can see. We first check the height to make one of our 5 possible height options. Then we use the wetness and temperature to make the biomes their own unique colors.

Below you can see an example output of what our algorithm created.
This is our biome map! It is by no means perfect, or even accurate to how the real world works but it shows how we can use noise layering to create new and interesting outputs!

The method we use here, however, is completely random, which makes for some strange results. For example there's "tundra" biomes ( turquoise color ) in the middle of a "desert" biome ( orange-ish - yellow color ). This should never happen in real life but because of the randomness of this it does.

This is actually similar ( albeit much less complex ) to how some games like Minecraft generate their worlds, so hopefully this gives some insight into that.

This method obviously needs some improvements and we will work on it in future variations. But in the meantime I hope you learned something. As usual the code is on GitHub here.

Thursday, May 26, 2016

Applying Simplex Noise to a Planet

Last time we talked about Simplex Noise, the noise algorithm we will use to create interesting features on our planet. The basic idea is simple, our cube which consists of 6 planes all facing a different way just need to have a 3-dimensional simplex noise algorithm applied to each face. And because we use the 3-dimensional algorithm it should cleanly wrap and easily around the planet making it appear seamless.

While this sounds simple it is actually quite complex and because of this I removed the "chunked level of detail" code from it until I got everything working properly.

Let's first talk about projecting a cube to a sphere briefly. There are a few ways to do this and my way is by no means the "best." One option is to write a Vertex Shader. This provides the advantage that all math related to projecting the cube is done on the graphics card and can actually speed up the process. I have decided to do it in a derived mesh class however. This allows me to more quickly make changes to the code and makes it so I do not need to write another shader. I may change methods in the future but this works in the meantime.

We can see that we apply a simple formula to each vertex. Then when we run it we get 6 planes that appear to be a sphere!

Now that we have the sphere we can apply the simplex noise formula over it. This is just a matter of getting the correct coordinates of the sphere and running the algorithm over those points. We save these points as a black-and-white image and render it on the sphere. When we do this we get a planet that looks like this.

Well it's round but it doesn't look very much like a planet! Since we have seamlessly applied this algorithm we now have a lot of options of what we can do with it! The most obvious one is to use this as a heightmap. In this case we will take a texture and check what color it is at a certain point. If it is less than a certain value we will set it to blue like an ocean! Otherwise it's green, like land! Lets look at how that turns out.
As you can see I only applied the colorization to one face of the planet! I also did some linear interpolation based on the height/depth of the land/ocean. This gives the deeper parts a darker blue and the higher parts a greener. While this still looks nothing like a planet it is progress!

It also opens new doors for what we can do. It is now possible to use noise algorithms for any use we want on a planet! This could be heatmaps to generate biomes or noise-y clouds! That will come at a later time though!

Thursday, April 7, 2016

Simplex Noise

Last time we made good progress on our planets. We made it so that when we are high above them they will have very little detail and when we are own the ground they will have lots of detail. However, we still just have a circular planet. We are going to need a way to give it more detail. To do this we are going to use a new noise algorithm, Simplex Noise.

Simplex Noise was actually designed by the same person who designed Perlin Noise, Ken Perlin. He considered Perlin Noise to have too many problems and to be poorly done and he wanted to correct those. Not only did he fix the problems that Perlin Noise had, he also successfully made a faster algorithm. Speed is going to be vital to us when we start moving around the planet because we want to render this in real time so this algorithm works perfectly for us. Let's take a look at how it works.

We can see here that the bulk of our algorithm is in the method called RawNoise3D. Simplex Noise has the advantage of being able to be done in multiple dimensions. We are rendering a 3D planet so we want 3-dimensions. This means that noise will wrap around the planet evenly and we will not see differences across different faces. Perfect!

The actual algorithm uses a "seed" of permutations to manipulate the data around a certain point, not the actual point itself. The math behind it is rather complex so I will not be going over it in detail. The next snippet we see is our two methods that we will use.

The method OctaveNoise3D is where we have variables that start to make the algorithm work. Then ScaledOctaveNoise3D will generate values that are in between an upper and lower bound. These are the two that we will use when generating our examples. Lets run it and see how it looks.
We can see here that this looks a lot like Perlin Noise! That's because it is. They both generate similar results but they do so in different ways. This will be what we use to make our terrain for our planet.

As usual the code is in Github here. I hope you enjoyed this and learned something new. Thanks for reading.

Wednesday, December 9, 2015

Procedural Generation in the Real World

Welcome back! So last time we tried to make procedural planets. We sort of achieved that but they didn't look that great. Our method may not have been the best but we also described others and there are real examples of people doing that, so let's take a look.

I think one of the most impressive examples of procedural content generation to date is No Man's Sky. I mentioned this game briefly in my last post but today I want to talk more about. No Man's Sky is impressive for a number of reasons. It achieved what we tried to do and generates procedural planets but it does so much more. No Man's Sky generated an entire procedural universe. A universe far bigger than any one person can ever explore. Each planet is unique and live demonstrations often surprise even the developers of the game because they find new generated content so frequently.
The above video is one of the developers showing off the game and talking about it. I highly recommend you watch it as it is very impressive what these people have made. Every planet has its own ecosystem. Plants, animals, biomes, all unique to each planet and all generated randomly. This game is an incredible feat of procedural content and I am personally extremely excited for the game to be released and to explore it.

The other example I mentioned in the last post was Space Engine. Space Engine generates the entire universe starting with out solar system. It uses realistic physics when creating these planets so many of them, or similar versions of them, can be found in the real world.

Video games aren't the only place procedural generation is used either. It is also popular in film and one of the best examples of this is Peter Jackson's The Lord of the Rings movies.
Above is a shot from the film of a massive Orc army. Each of these soldiers was based on a basic orc model. From there a computer made changes to each's appearance and placed them in after filming. This allowed Peter Jackson to create a massive army where no two soldiers are the same.

Procedural content generation has come a long way. We saw in an early post that it started with dungeons in rogue-like games, and today, it has progressed to the ability to generate an entire universe and create armies. As technology progresses more and more, so will the procedural content generation methods, and it will be interesting to see what we can create.

Procedural Planets

We've come a long way. Starting with a simple dungeon all the way up to the noise functions. Having made it this far is an accomplishment. It's time to move onto bigger and better things though. All of our past posts have been dealing with 2-dimensional content. Today we are going to start 3D, specifically 3D planets ( A.K.A. normal planets ). Procedural planets are a pretty popular topic currently. There are many video games like No Man's Sky ( We are going to talk in more detail about this game in the next post ), and the impressively realistic Space Engine among many others that generate these procedural planets. So let's first talk a little bit about some ways it's done first.

As you have previously seen, there are many ways to accomplish a task with procedural content generation, this is no exception. One way to generate procedural is to actually start with a cube and use a noise function like Perlin or Worley and adjust the points on the cube based on those height values. From there the cube is then projected to a sphere and you have a planet with terrain!

This is not how we are going to do ours though. We are going to do something completely different in fact. While doing some research I stumbled upon one persons interesting idea on procedural planets. It was relatively simple to implement however he had not done it. So I decided to implement it for this post and see how good the generated planets look.

The basic idea is as follows. You first generate a plane with a random rotation around the x, y, and z-axis. You then get every vertex on your planets surface and dot product it with the planes normal vector. If the dot product is greater than zero you move the point in a small amount, if the dot product is less than zero you move it out a small out, and if that dot product is zero, you leave it alone. This is done over a number of iterations with a random plane each time and it will generate peaks and valleys due to the random moving in and out of points. Pretty clever, so let's implement it.


As you can see, there's quite a bit of new stuff here that we have never seen before. That is because this is part of a bigger project. There's a considerable amount of code that is rendering the planet, moving the camera, and things like that. We're not gonna talk about that cause that's a different blog. We're interested in the code above.

As you can see we first make a normal vector that is the planes normal. This is random and each value is between -1 and 1. We create a scale value and determine how many iterations we want to do. We loop through the iterations and loop through each vertice with each iteration doing the dot product each time and moving the points by a scale value. So, let's run it and see how it turns out.

First, this is what our "planet" looks like before we did anything to it. I applied a random texture I had readily available. At this point it's a perfect sphere so all is good.

Next, I ran it over 1 iteration just to test if this idea would even work at all. It did! It created a weirdly shaped planet by moving the bottom inwards and the top out. Great! Let's run it over a larger number of iterations.
Hmm... Interesting. This was run over 100 iterations. You can clearly see the planet was misshaped and now has a series of peaks and valleys. If you look at pictures of earth from space though you can't see the difference in elevation, it looks perfectly round and this doesn't! That is because this is on a small scale. In order to achieve that effect I would have to make the scale factor incredibly small and the planet incredibly large with a staggering number of vertices and I don't have the time for that.

Because of this, I would say the "planet" looks more like an asteroid. So perhaps our method needs to be slightly different. Maybe we will try a new method in the future. But for now, we have a starting place. We rendered some planets and we made them not perfectly spherical.

As usual, thanks for reading. Hopefully we get a better result next time. If you want to see the full source code go here. I have added all necessary code in the Prodedural_Planets folder so you can run it if you want. The code in this post is located in mesh.cpp.

Tuesday, December 1, 2015

Worley Noise

Previously we discussed two different noise algorithms, Diamond-Square and Perlin noise. Both of these noise algorithms produce similar results and can be used for a variety of things but there are certain places they aren't great. So today we are going to talk about one last noise algorithm that is versatile and produces results very unlike the previous two algorithms. That algorithm is Worley Noise. Also referred to as Cell Noise or Voronoi noise, this algorithm is very useful in generating or simulating stone, water, and cells. So lets get started in talking about this!

Worley noise is one of the more complicated noise function we've covered. Not only that, it is also the slowest of them. It however is more customizable than the other ones. We will see examples of this at the end. First, lets take a look at our constructor.


Here we can see where everything is set up. We have a variable called permutations that is set with unique values from 0 to 255. These numbers are then swapped around to make them in a random order. These are used to determine the location of the "cells" in the final image. In the constructor we call the fill_map method which can be seen below.


The idea of the fill map method is simple. It iterates through each pixel and determines the color it should be. Along with that it also saves the maximum and minimum values that are seen. These can be used for scaling if necessary. In the fill_map method we see smoothed_noise is called so lets look at that.


The smoothed_noise method is where all the calculations are done. All of these are based on distances which will return the grayscale value for that pixel. How this is done can vary though. In the code we see 3 commented out lines. If one is uncommented we can get a completely different looking picture. These are the distance functions and they are what make this algorithm so powerful. By simply changing the distance algorithm a stone texture, water texture, or many other textures can be created. We will see examples of all of these when we actually run the algorithm. Let's take a look at how these distances actually work.


Each distance method is a form of the distance formula ( sqrt( x2 - x1 ) ^ 2 + ( y2 - y1 ) ^ 2 ) ), but they all have their own touches. So now that we have a basic understanding of the algorithm, lets see what it actually outputs. Up first we are going to use euclidean distance.
Euclidean Distance
Here we can see the algorithm output a picture that looks similar to cells. It's very unlike every other noise algorithm we've seen this far. Next, manhattan distance. 
Manhattan Distance
Manhattan distance creates diamond-like shapes. It also creates some very light and very dark areas which can be seen above. Now, chebychev distance.
Chebychev Distance
Chebychev has a similar look to manhattan although instead of diamonds they are more square and very interesting looking. Lastly let's look at quadratic distance. 
Quadratic Distance
Quadratic creates a similar look to euclidean but slightly different. All of these distance function can be modified and more can be added to create many different and unique effects. It's just a matter of playing with them.

As usual I hope you learned something new or found this interesting. For the full source code you can go here. See you next time!